
IKEA LATT Table Hack
The LATT table from IKEA is a blank slate for whatever you can imagine. In this IKEA hack, I added color blocked chairs and dipped legs to turn this kids’ table into something adults won’t mind having around. I’m also sharing how a tutorial for how I made the cushioned, fabric covered seats.
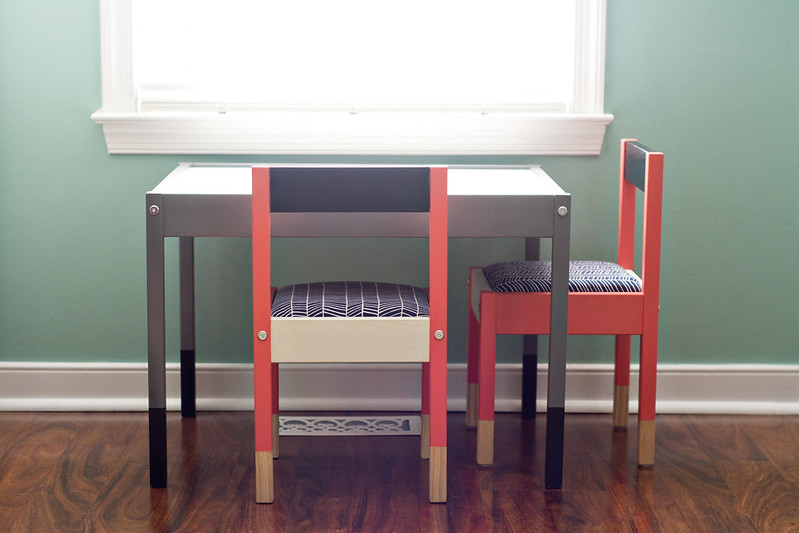
Last year for Christmas, Eric and I got our daughter the LÄTT activity table from IKEA. At $20 for the table and two chairs, you really can’t beat the price. The set is basically a blank slate for anything you can dream up. We’ve had the set for almost a year, so I figured it was time to share my hack with you guys in case anyone was considering doing something like this for their little ones.
The table and chairs are in our office/playroom area downstairs (it’s actually the formal dining room, but we’ve never used it as such), and I wanted something that would go well with the rest of our decor but still have colors our girl loves. We painted and assembled everything before Christmas, but I ended up taking them apart later to finish the chair seats (that kitchen renovation got in the way of a lot of my Christmas crafting).
I’m super into “dipped” furniture legs and went that route here, too. I spray painted the table gray with paint I had leftover from another project. Once it was painted, dried and assembled, I taped off the legs and painted the bottoms with navy paint that I mixed from blue and black acrylic paints I already had. I tried to find a navy paint I liked, but none of them were dark enough. Mixing my own wasn’t so bad until I had to match the color when I painted her MÅLA easel. The pine soaked up the acrylic paint like crazy, and, in retrospect, I probably should’ve treated it with something prior to painting.
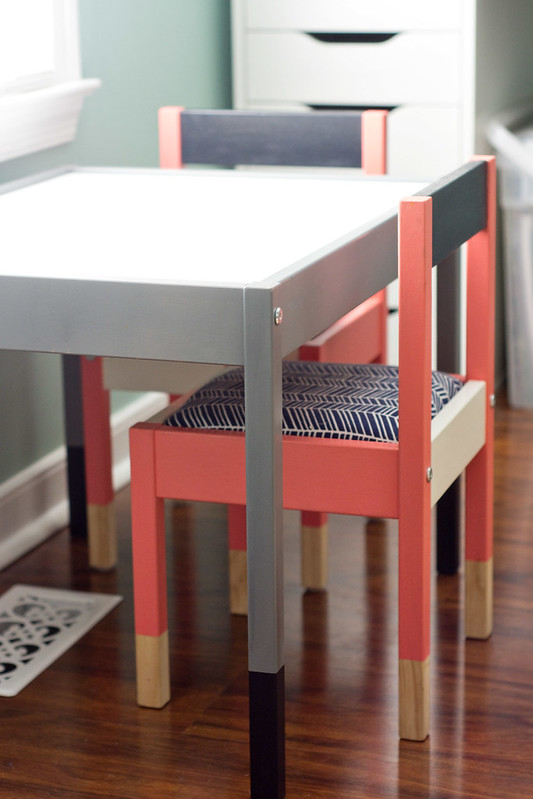
I went for a color block look to the chairs, using leftover white paint from our kitchen renovation and coral acrylic paint from Clara’s first birthday party. I also used the navy paint from the table legs on the backs of the chairs. Instead of “dipping” the bottom of the legs in a different color, I taped them off and left them bare, which is the same thing I did with the easel. I love the way the wood looks with the other colors. After everything was painted, I added a few coats of satin poly to keep everything nice and protected. This makes cleaning much easier, something that’s definitely necessary when it comes to kid furniture.
The seats are the real craft here. The LATT seats aren’t exactly comfortable feeling, and I wanted to add some type of cushioning to the seat. Most of the tutorials I saw added cushions to the top of the seat, but I wanted something more permanent. I came across this tutorial, and it was exactly what I wanted. The chairs have held up wonderfully the past year.
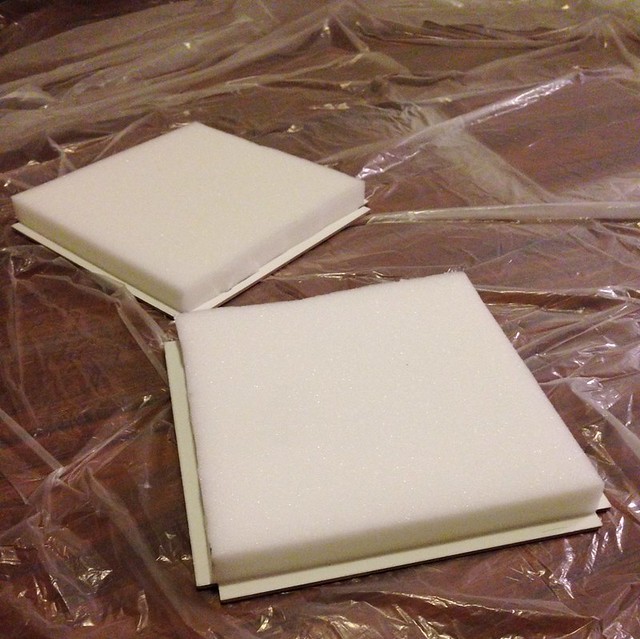
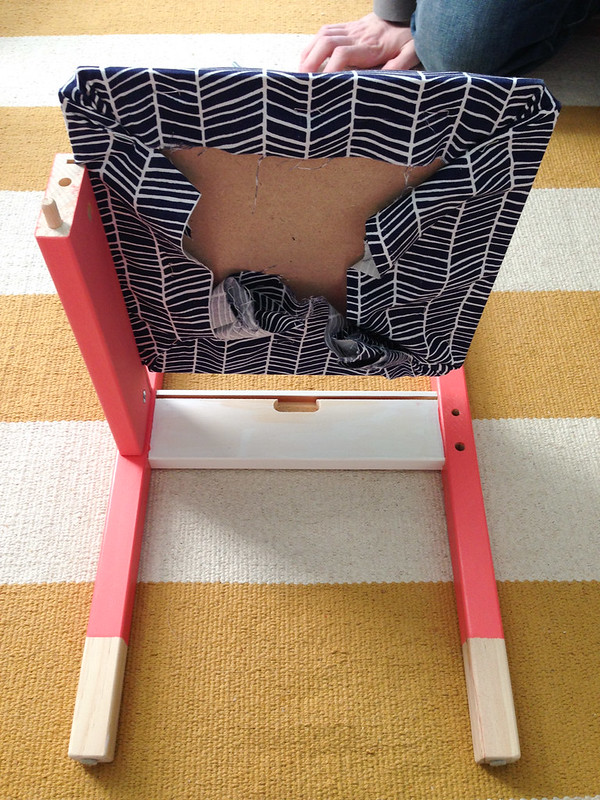
To make the seats, you need 1-inch thick craft foam, spray adhesive and enough fabric to cover the seat cushion. (The fabric I used is Joel Dewberry Herringbone in the color Lake.) Do this project once the chairs have been painted but before you assemble them. Cut the foam to fit just inside the seat piece, leaving about half an inch around the entire piece. I used the notches cut out of the corners as guides. Use spray adhesive to adhere the foam to the seat piece, making sure to cover whatever surface you’re working on because that stuff goes everywhere. Once the foam is attached, measure how much fabric you’ll need, taking into account about a 4-inch overhang on all sides. Place the foam covered seat piece (foam side down) inside the square of fabric (wrong side up). At this point, all you have to do is pull the fabric tightly to cover the seat. I used a staple gun to staple in my fabric from the bottom side of the seat. You can use a hot glue gun if you prefer, but I wouldn’t recommend the spray adhesive because it’s not really strong enough to hold the fabric in place. Just keep pulling and stapling until the seat is covered. Repeat with the second seat. If your fabric has a pattern like mine, take care to keep the fabric straight as you attach it.

I thought I’d have trouble assembling the chair with the extra padding on the seat, but it slid in much easier than I was expecting. I assembled the back and one side of each chair, then I laid each chair on its back. Using downward pressure, I slid the fabric covered seat into the slots on the side and back of the chair. Then I added the remaining side piece and front piece and screwed it in to finish off the seat. Ignore all the excess fabric, which I didn’t think to cut off while I was photographing the project.
I left the table top alone. It wipes off really easily, even when it gets paint/stamps/food/whatever on it. This table gets daily use – as an art table, a place to have a snack, a spot for me to take blog pictures, a surface to put together a puzzle, a kids’ table when we have friends over for dinner.
I’m obviously not a craft blogger, but I wanted to share this project since we’ve gotten so much use out of it, and I thought it might inspire someone to do a little IKEA hacking of their own.


That is so cute! I love the colors you picked.
Thank you! I wasn’t sure it would all work together, but I am still a big fan of it.
Love this…doing it for my daughters christmas gift. How much fabric did it take?
You know, I don’t even remember. The seats are about 9.5 inches square if that helps. I hope your daughter loves it!
Love this! Was planning on doing this for my son before Christmas…nothing like last minute 🙂 But just wanted to ask about the cushion/fabric. Did your daughter ever get it dirty…what did you do about washing?
Oh I know what you mean! I’m currently working on Clara’s play kitchen and hoping I can finish it by Christmas.
The only thing that’s gotten on the cushion is a marker, and I was able to use a wet rag to get most of the ink off. She does snack at the table, but that’s mostly things that aren’t messy like apples, crackers, cheese, etc. Good luck and let me know if you have any other questions! And please share a picture because I’d love to see it!
love this!
Oh that’s awesome! I would love to see a photo of it because that color combination sounds lovely!
That looks amazing! I will definitely be purchasing this set for my daughter, and using your method for covering the seats!
Thank you! They’ve held up really well! The only downside is that crumbs tend to get stuck in the crevices between the cushion and the chair frame, but it’s not hard to vacuum.
do you happen to remember the name of the coral and gray paints you used for the table?
I’m not sure on the gray because I don’t have anymore, but the coral is Coral Blush by Americana.
How many bottles did you use for the chairs? I’m working on my daughter’s table and chairs now and I wonder if getting the acrylic paint would be both easier and cheaper than having to buy quarts of two or three different colors plus primer and and a protective coat.
I don’t even remember. I’m sorry! We had a few leftover from her first birthday party, and I don’t think we had to buy any extras.
love this idea SO much i am getting everything together to surprise my son for Easter. i read below you said seats were 9.5″x9.5″. is that the size of the 1″ foam square? or the entire size of the panel? also…what is the top of the table? just white plastic? did you not paint that? could it be painted? thanks!
I left the tabletop alone. It wipes off super easily, so I didn’t bother doing anything to it. I’m not sure I would paint it without sealing it somehow because it seems like the paint would chip or scratch easily. That 9.5″ square measurement is what is exposed once the chair is assembled, so it’s probably pretty close to what I cut the foam to. I left a little room along the edges to make sure I could assemble the chair once the foam and fabric were attached. Hope that helps!
So I am confused with the staple gun…don’t the staples poke their little tushies?
The staples don’t go up that far. There probably are some that could, but the staples I used in the gun were relatively short.
I know this is ages later, but when you say acrylic paint do you mean like craft acrylics rather than latex paint? Thanks! 🙂
Yep, just plain old craft paint. I had a ton of it on hand at the time, so it made sense to put it to use for this project. If you’ve got latex paint in a color you like, then by all means use that. After painting most of our house, we’ve got quite the collection of it built up these days, too.