Chocolate Babka
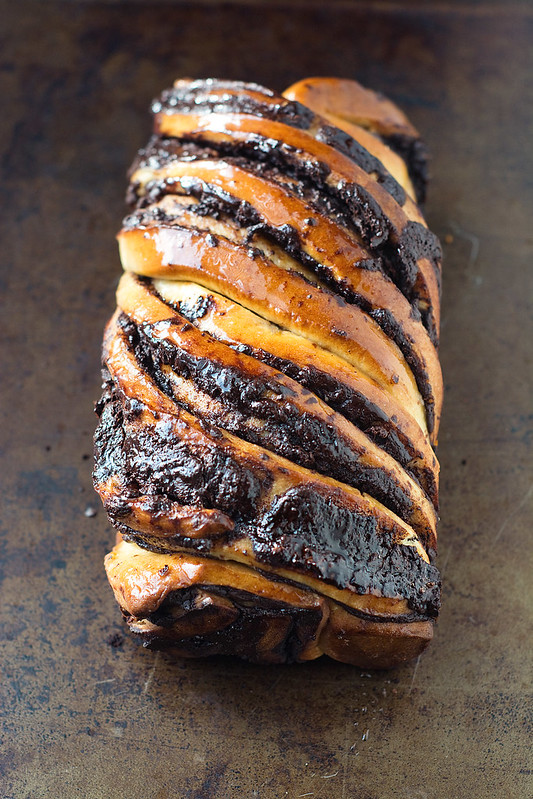
Rich and glossy chocolate babka is a brioche dough with spirals of dark chocolate. You can call it bread or call it cake, but all you need to know is it’s delicious.
Clara and I spent yesterday morning in the kitchen making these chocolate babkas. Time in the kitchen with her is something I treasure in a way that I can’t fully describe. To be able to show her how to create things, to turn ingredients into food, is truly magical. I don’t know if she’ll remember these moments, but I know I will. Her in a tutu and apron, standing on her little chair, stirring up chocolate and sugar, Disney songs playing in the background. The moment is gone, briefly, while she runs around the kitchen screaming “we can fly” during a Peter Pan song. Then she’s back to help spread the chocolate onto the dough and eat handfuls of sprinkle nuts on top.
Our time in the kitchen resulted in one of the most beautiful and delicious foods to ever come out of our oven. I don’t think my photos even do justice to how good these taste. Rich and glossy, these loaves will tempt you well before they’re cool enough to cut. I had this recipe saved for quite some time, and I’m telling you now not to wait as long as I did to try it. Those swirls of chocolate may look complicated and intimidating, but this recipe is actually easier than some other yeast breads I’ve made. You don’t even have to braid the loaf.
I’m not certain where chocolate babka falls on the cake or bread scale. It’s reminiscent of brioche, but it’s decidedly sweet thanks to the chocolate inside and the simple syrup brushed on the outside. I would totally eat it for breakfast or dessert, so do with that what you will. Make a couple loaves today, and you’ll be set to turn one into insanely good French toast on Saturday. And if you’re still looking for Valentine’s Day ideas, I’ve got you covered.
- COOK TIME:
- YIELD: 2 loaves
For the dough:
4¼ cups all-purpose flour, plus extra for dusting
½ cup granulated sugar
2 teaspoons instant yeast
Grated zest of half an orange
3 large eggs
½ cup water and up to 1 to 2 tablespoons extra, if needed
¾ teaspoon fine sea salt
⅔ cup unsalted butter at room temperature
Sunflower or other neutral oil, for greasing
For the filling:
4½ ounces dark chocolate
½ cup unsalted butter, cold is fine
Scant ½ cup powdered sugar
⅓ cup cocoa powder
For the syrup:
⅓ cup water
6 tablespoons granulated sugar
The dough does best with an overnight rest, so be sure to plan ahead.
Deb mentioned in her post that the loaf with nuts was messier, and it definitely is. I made one with hazelnuts. It tasted amazing but didn’t hold its shape as well as the loaf without. If you’d like to give it a try, you can sprinkle ½ cup of toasted nuts over the chocolate before rolling up each loaf.
These keep a few days at room temperature and can also be frozen.
- 1
To make the dough, combine the flour, sugar, yeast and zest in the bottom of the bowl of a stand mixer. Add the eggs and ½ cup of water. Mix with a dough hook on low speed until it comes together. It may be a bit dry, but you can add the extra water if the dough isn’t coming together at all.
- 2
With the mixer running, add the salt and then the butter, about a tablespoonful at a time. I like to just pinch off pieces of butter as I add them. Increase speed to medium and knead the dough until it’s smooth, about 10 minutes. If the dough doesn’t pull away from the sides of the bowl, you can add another tablespoon of flour.
Coat a large bowl with oil. Scrape the dough into the bowl, then cover with plastic wrap. Refrigerate overnight. The dough will not double.
- 3
The next day, when you’re ready to assemble the loaves, make the filling. Melt the butter and chocolate together. Stir until smooth, then stir in the powdered sugar and cocoa powder; the mixture should form a spreadable paste. Set aside while you roll the dough.
- 4
Line a baking sheet with parchment. Remove half the dough from the refrigerator. On a well-floured surface, roll the dough to about 10-inches wide by 10 to 12-inches long.
Spread half of the chocolate mixture over the dough, leaving a ½-inch border all around. Brush the end farthest from you with water. Tightly roll the dough into a log and use the dampened end to seal it. Transfer to the baking sheet and place in the freezer for 10-15 minutes. Repeat with remaining dough and chocolate.
- 5
While the dough logs are in the freezer, coat two loaf pans with oil or butter, and line the bottoms with parchment paper. (I used one 9″x5.5″ pan and one 9″x4″ pan. The smaller pan worked best.)
Remove the dough from the freezer. Trim ½-inch from each end of the logs. Gently cut each log in half lengthwise and place them next to each other, cut sides up. Lift one side over the next. Gently pinch the ends together and twist the dough, leaving the cut sides facing out as best you can. This step will be messy, but the loaves will still come out of the oven looking lovely. Carefully transfer each loaf to the prepared pans. You can nestle the cut ends into the pans if you want.
Cover the loaves with a damp tea towel and leave to rise for another 60-90 minutes at room temperature.
- 6
When ready to bake, heat the oven to 375º. Remove towels and place each loaf in the center of the oven. Bake until a skewer inserted in the center comes out without any dough attached, 25-30 minutes. An underbaked one will fill rubbery when the skewer is inserted, but a done one will feel springy and offer little resistance. If the top is browning too quickly, cover it with foil.
- 7
While the babkas are baking, make the syrup. Bring the water and sugar to a simmer in a small saucepan until the sugar dissolves. Remove from heat and allow to cool slightly.
As soon as the babkas are done baking, remove from the oven and brush the syrup all over each. It looks like a ton of syrup, but it soaks into the bread and leaves it looking beautifully glossy on top. Leave the loaves in the pans on a wire rack until they’re cool enough to handle, then remove to the wire rack to cool completely (if you can).


Definitely a fabulous recipe! I looooove that chocolate stuffed in there!
This looks so good!
This looks awesome!! I can’t wait to make the same memories in the kitchen with my daughter…right now at 9 months she is content to watch my in her highchair while she feeds the dog her puffs. 🙂
I’ve also had this on my bucket list for a while. It’s really time I made it!
Hi what can be the substitute for eggs in this recipe?
I’m not sure, sorry! I’ve only made it as written.